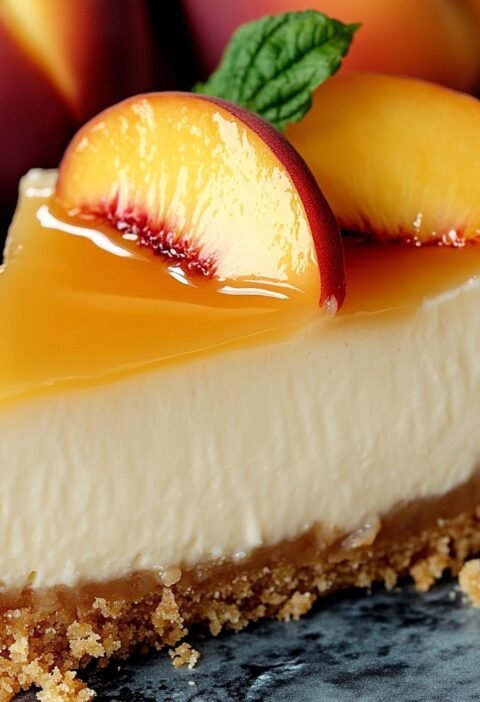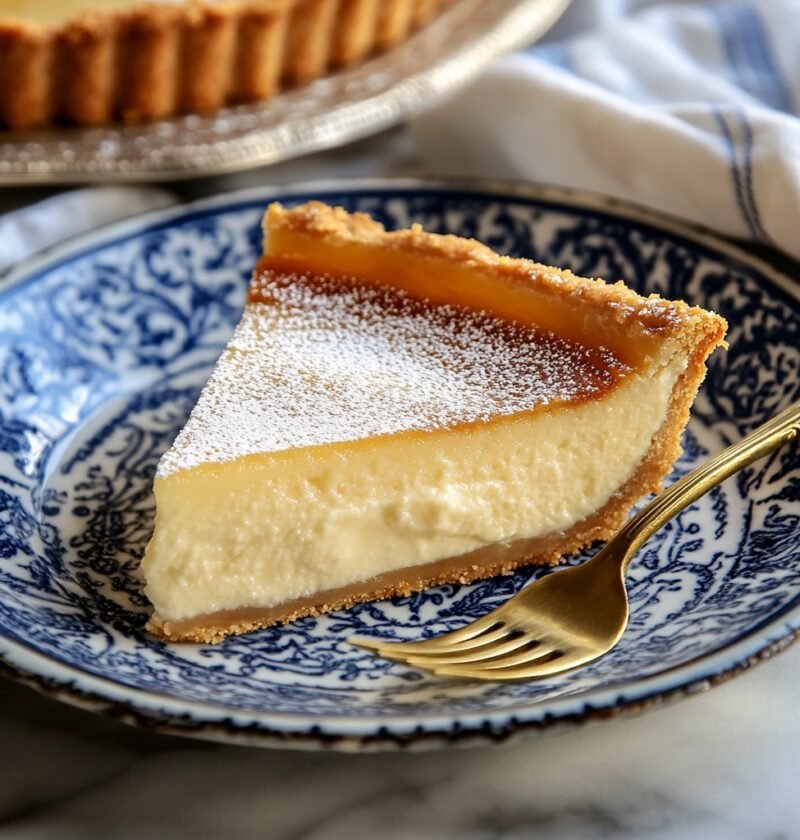
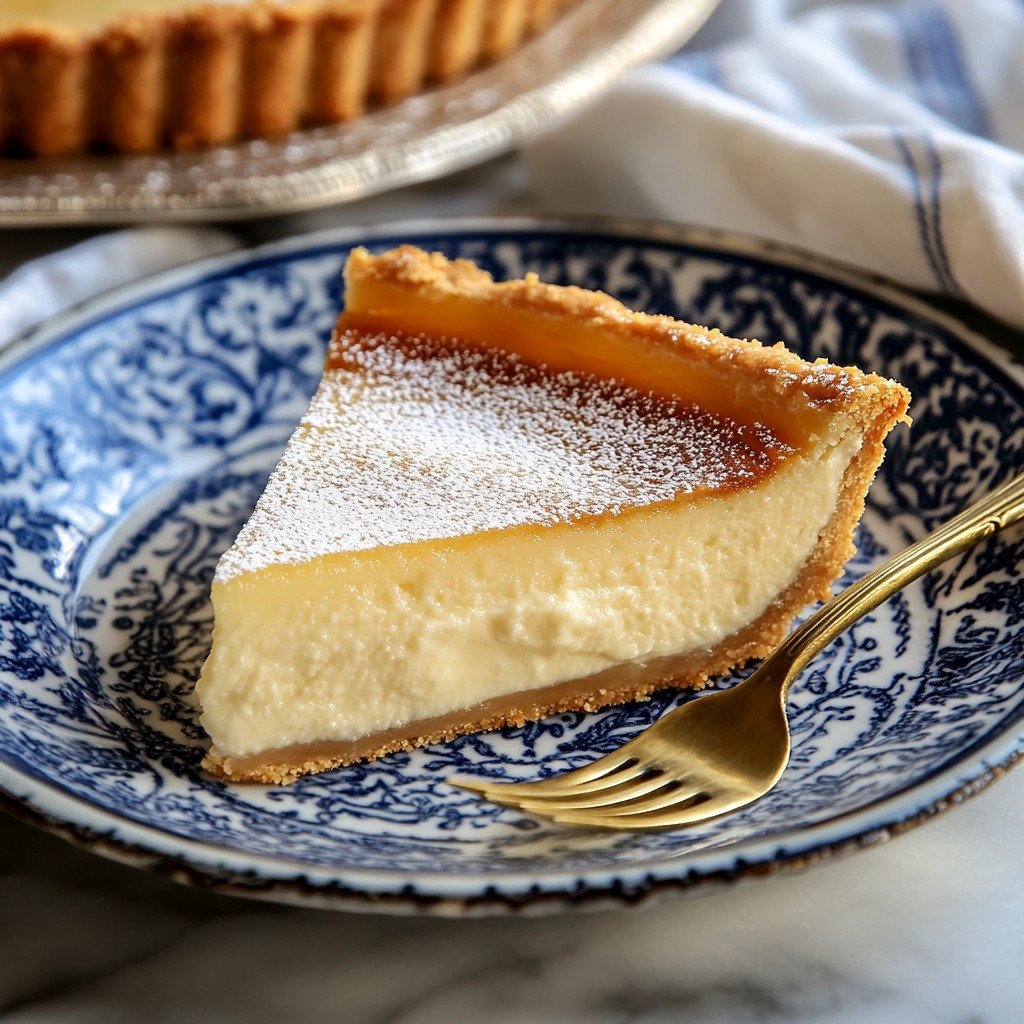
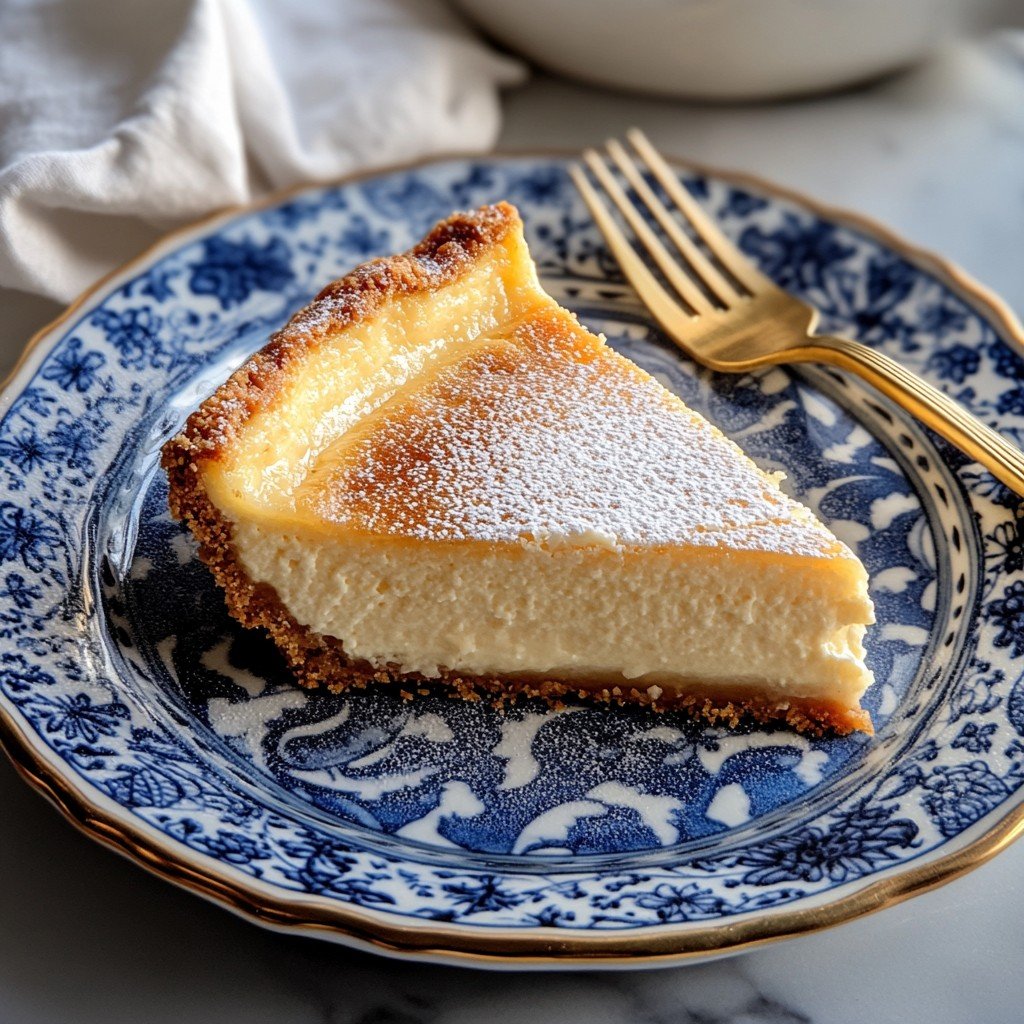
Montgomery Pie Classic Spring Baking is a cherished recipe that celebrates the essence of traditional American baking. Renowned for its unique blend of molasses, lemon, and a soft cake-like filling atop a flaky crust, this pie holds a special place in springtime dessert menus.
The origins of Montgomery Pie are often attributed to the Pennsylvania Dutch region, where resourceful bakers expertly combined pantry staples like molasses and fresh lemons to create a dessert that bridges the gap between cake and pie.
Spring is the perfect season for this pie, as the vibrant citrus notes complement the warming weather, bringing a refreshing twist to classic baking traditions. If you are searching for a pie that balances sweetness and tartness, Montgomery Pie Classic Spring Baking is the ideal choice.
It is a delightful treat for family gatherings, spring festivities, and special occasions, making it a must-try for both novice and seasoned bakers.
In this comprehensive guide, you will not only find a step-by-step recipe but also discover the secrets to achieving the perfect Montgomery Pie every time, along with tips, nutrition insights, and serving suggestions to make your baking experience truly memorable.
Ingredients
- 1 unbaked 9-inch single pie crust (homemade or store-bought)
- 1/2 cup unsalted butter, softened
- 1 cup granulated sugar
- 2 large eggs, room temperature
- 1/2 cup unsulfured molasses
- 1/4 cup whole milk
- 1/4 cup fresh lemon juice
- 1 tablespoon grated lemon zest
- 1 1/2 cups all-purpose flour
- 1 1/2 teaspoons baking powder
- 1/4 teaspoon salt
- 1 teaspoon pure vanilla extract
- Powdered sugar, for dusting (optional)
Instructions
- Begin by setting your oven to 350°F (175°C), allowing it to preheat thoroughly. Place your 9-inch pie pan on a stable surface and gently line it with the unbaked pie crust. Take care to trim away any excess dough and flute the edges using your fingers or a fork, giving your pie a beautiful, rustic finish.
- Using a large mixing bowl, combine the softened unsalted butter with granulated sugar. Using a hand mixer or stand mixer set to medium speed, beat them together until the mixture appears light and fluffy, usually requiring about two to three minutes. Proper creaming ensures a smooth and airy filling.
- Add the eggs to your creamed mixture, one at a time. After cracking the first egg into the bowl, mix thoroughly until it is fully integrated, then repeat with the second egg. This step helps bind the filling and contributes to the pie's tender texture.
- Pour the unsulfured molasses into the batter and stir well to blend it evenly. Follow with the whole milk, fresh lemon juice, and grated lemon zest. Mix everything together until the texture of the batter is smooth and the citrus is evenly distributed, ensuring a balanced flavor.
- In a separate mixing bowl, sift together the all-purpose flour, baking powder, and salt. Gradually add this mixture to the wet batter, stirring gently after each addition. Mix only until everything is just combined to maintain a tender crumb and avoid overworking the dough.
- Incorporate the pure vanilla extract into the batter, stirring just until it is evenly mixed throughout the filling.
- Pour the prepared filling into your pie crust, using a spatula to smooth the surface. Spreading the filling evenly ensures uniform baking and a professional appearance.
- Carefully transfer the pie to your preheated oven. Bake for 40 to 45 minutes, monitoring its progress. The pie is ready when the top turns a light golden brown and a toothpick or cake tester inserted into the center emerges with just a few moist crumbs attached.
- Remove the pie from the oven and rest it in the pan on a wire rack. Allow it to cool undisturbed for at least one hour, as this helps the filling set and makes slicing easier.
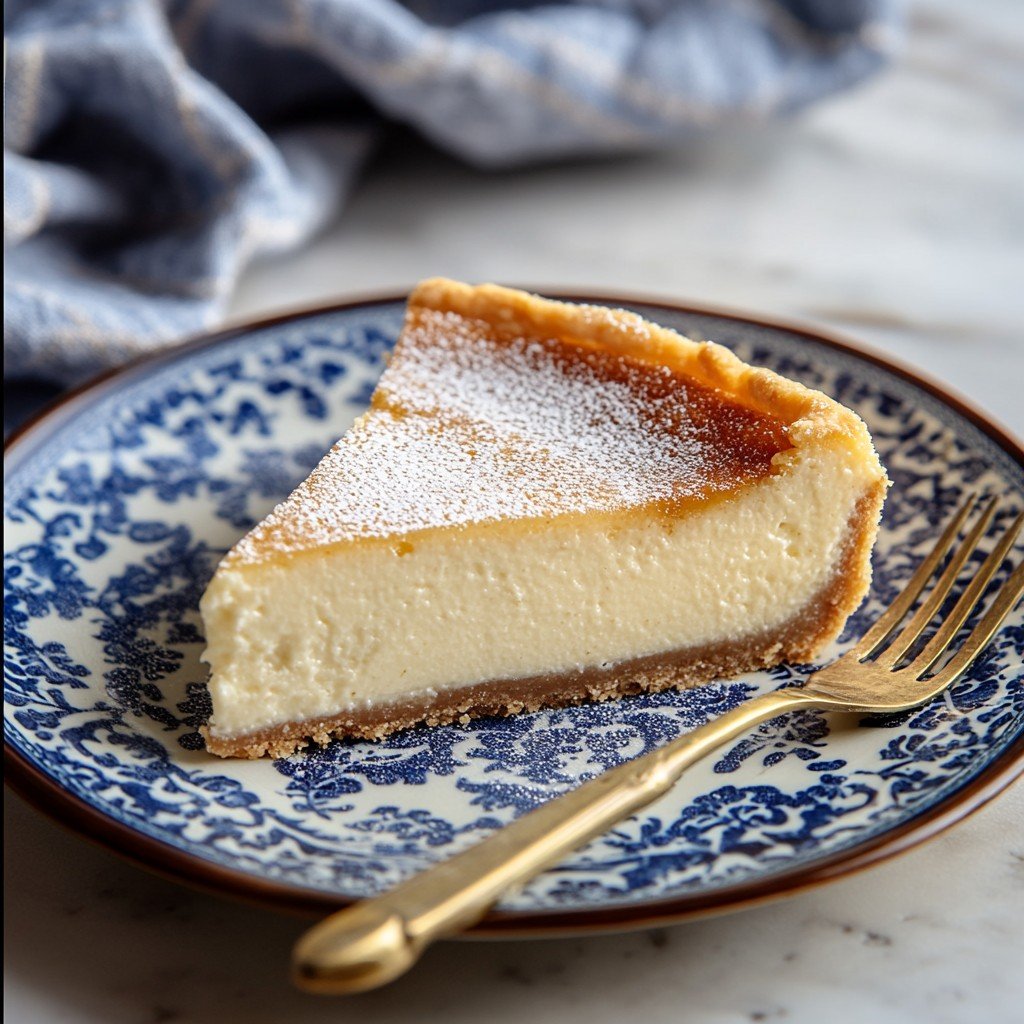
- For an attractive finishing touch, sprinkle the fully cooled pie with powdered sugar if desired. Slice it into portions and serve at room temperature or slightly chilled, depending on your preference.
Nutritional Information
Montgomery Pie Classic Spring Baking offers a delightful taste experience, but it’s also important to understand the nutrition it brings to your table. Each serving (assuming the pie is cut into 8 portions) typically contains approximately 340-380 calories, with the main sources being butter, sugar, and molasses.
The pie provides around 5g of protein from the eggs and milk and carries about 15-18g of fat, the majority of which comes from the butter used in the recipe. Carbohydrates total about 50-55g per slice, contributed by the flour, molasses, and sugar.
While it’s a treat best enjoyed on special occasions, the inclusion of lemon juice and zest offers a dose of Vitamin C, and eggs supply B vitamins and some essential minerals.
Molasses itself is a naturally rich source of iron and calcium, adding a slight nutritional boost compared to other refined sweeteners. It’s advisable for those watching their sugar or fat intake to enjoy Montgomery Pie Classic Spring Baking in moderation.
The pie is naturally free from trans fats and can be made with organic or higher quality ingredients for those wanting a cleaner indulgence. For guests with specific dietary needs, it is gluten and dairy containing, so substitutions should be considered when necessary.
Wine and Beverage Pairings
A dessert as distinctive as Montgomery Pie Classic Spring Baking pairs beautifully with an array of beverages. For a classic touch, serve with freshly brewed black tea or lightly roasted coffee, both of which balance the molasses’ earthiness and the lemon’s brightness.
For an adult gathering, chilled Moscato or a sweet Riesling provides gentle fruity notes that complement the pie’s flavors without overwhelming them. If you prefer something non-alcoholic, a sparkling lemon water or a homemade lemonade echoes the zest within the pie, offering a refreshing finish.
Those looking for an even richer experience can enjoy a small glass of tawny port or a spiced chai, which bring out the warming qualities of the molasses. Ultimately, choose a beverage that either complements the dessert’s tart-sweet profile or contrasts elegantly with its dense, cake-like crumb.
Cooking Tips and Variations
For the best Montgomery Pie Classic Spring Baking, consider these helpful tips and potential variations. When preparing your pie crust, a homemade crust will always yield superior flakiness and flavor compared to store-bought versions, but quality pre-made crusts are a worthy substitute for convenience.
Ensure your butter is softened to room temperature before mixing; this helps achieve a smooth, well-aerated batter for optimal texture. Zesting the lemon before juicing it makes the process easier and ensures you extract maximum flavor and fragrance from your citrus.
The quality of molasses used is important; opt for unsulfured molasses for a milder, richer flavor profile that pairs beautifully with the lemon. Be mindful not to overmix the batter after adding the flour, as overworking can lead to a dense pie and tough texture.
When baking, keep an eye on your pie in the final 10 minutes, as oven temperatures can vary—introducing a pie shield or loosely tenting foil over the edges helps prevent the crust from over-browning.
For those interested in variations, you can experiment by substituting orange zest for a different citrus note or adding a sprinkle of chopped nuts such as pecans to the batter before baking for a delightful crunch.
While the classic recipe shines on its own, pairing with a dollop of sweetened whipped cream or vanilla ice cream can make it extra special. If you are serving to a larger crowd, the recipe is easily doubled and baked in two pans.
Serving Suggestions
Montgomery Pie Classic Spring Baking is best when given the spotlight at your dessert table. After allowing the pie to cool for at least one hour, slice it sharply with a serrated knife, ensuring clean, neat portions.
Present each slice on a plate, optionally adding a generous dusting of powdered sugar for an elegant appearance. Many enjoy this pie at room temperature, where its flavors are most pronounced, but serving it slightly chilled highlights the tart lemon and the moist crumb.
For celebratory occasions, accompany each slice with a dollop of whipped cream or a scoop of good-quality vanilla ice cream. Consider garnishing each serving with a curl of lemon zest or a sprig of fresh mint for a sophisticated flourish.
This pie is especially suited for spring brunches, picnics, or as a sweet conclusion to holiday meals. Serve alongside fresh berries for color and contrast, or arrange slices on a cake stand for a beautiful presentation.
Because of its distinctive flavor, Montgomery Pie Classic Spring Baking works well as a standalone dessert or as part of a buffet featuring other traditional American pastries and pies.
Provide small dessert forks and linen napkins for a touch of formality, and watch as your guests savor the blend of classic molasses and citrus that defines this timeless recipe.
Health Benefits
While Montgomery Pie Classic Spring Baking is an indulgence meant for special occasions, it does contain some healthful elements. The lemon juice and zest supply natural Vitamin C, supporting immune health and enhancing antioxidant intake.
Molasses, unlike many other pie sweeteners, is a source of dietary iron, calcium, potassium, and magnesium, contributing modestly to daily mineral requirements. Eggs provide quality protein and diverse vitamins, while milk lends calcium and vitamin D.
However, it’s best to enjoy the pie in moderation due to its sugar and saturated fat content, especially for those managing blood sugar or cholesterol.
For a lighter approach, serve smaller portions alongside fresh fruit, or experiment with substituting half of the all-purpose flour for whole-wheat pastry flour to incorporate more fiber. Using organic eggs, grass-fed butter, or unrefined sugar can give a slight nutritional upgrade.
Remember, the true benefit of Montgomery Pie Classic Spring Baking lies in its ability to gather friends and family around the table; enjoyed occasionally, it fits beautifully into a balanced lifestyle.
Frequently Asked Questions
Yes, Montgomery Pie Classic Spring Baking can be baked a day in advance. After cooling completely, cover the pie tightly and store it in the refrigerator. Serve chilled or bring to room temperature before slicing.
To make a gluten-free version, substitute the all-purpose flour with a high-quality gluten-free flour blend. Ensure your pie crust is also gluten-free. Baking times may vary slightly, so monitor the pie closely.
While reducing sugar slightly is possible, doing so may affect the pie’s texture and structure. A reduction of up to 1/4 cup can work, but keep in mind the balance of flavors comes from the combination of molasses and sugar.
Keep any leftover Montgomery Pie in an airtight container or wrapped in plastic wrap in the refrigerator for up to 3 days. For best texture, allow slices to come to room temperature before serving.
Always use unsulfured molasses for Montgomery Pie Classic Spring Baking. It provides a mild, sweet flavor, unlike blackstrap molasses, which is more bitter and less suited for desserts.
Montgomery Pie Classic Spring Baking stands as a testament to the enduring allure of traditional American desserts. Its harmonious combination of zesty lemon and rich molasses baked into a soft, cake-like interior makes it a true seasonal favorite. Whether you are introducing this pie to friends for the first time or reliving cherished springtime memories, this recipe offers approachable steps and delicious results. Perfect for family gatherings, brunches, or simply indulging in a nostalgic treat, Montgomery Pie is sure to earn a place in your collection of classic desserts. With careful attention to technique and flavor, each bite captures the spirit of springtime baking and the comfort of time-honored recipes.
Ingredients
- 1 unbaked 9-inch single pie crust (homemade or store-bought)
- 1/2 cup unsalted butter, softened
- 1 cup granulated sugar
- 2 large eggs, room temperature
- 1/2 cup unsulfured molasses
- 1/4 cup whole milk
- 1/4 cup fresh lemon juice
- 1 tablespoon grated lemon zest
- 1 1/2 cups all-purpose flour
- 1 1/2 teaspoons baking powder
- 1/4 teaspoon salt
- 1 teaspoon pure vanilla extract
- Powdered sugar, for dusting (optional)
Instructions
-
1Begin by setting your oven to 350°F (175°C), allowing it to preheat thoroughly. Place your 9-inch pie pan on a stable surface and gently line it with the unbaked pie crust. Take care to trim away any excess dough and flute the edges using your fingers or a fork, giving your pie a beautiful, rustic finish.
-
2Using a large mixing bowl, combine the softened unsalted butter with granulated sugar. Using a hand mixer or stand mixer set to medium speed, beat them together until the mixture appears light and fluffy, usually requiring about two to three minutes. Proper creaming ensures a smooth and airy filling.
-
3Add the eggs to your creamed mixture, one at a time. After cracking the first egg into the bowl, mix thoroughly until it is fully integrated, then repeat with the second egg. This step helps bind the filling and contributes to the pie’s tender texture.
-
4Pour the unsulfured molasses into the batter and stir well to blend it evenly. Follow with the whole milk, fresh lemon juice, and grated lemon zest. Mix everything together until the texture of the batter is smooth and the citrus is evenly distributed, ensuring a balanced flavor.
-
5In a separate mixing bowl, sift together the all-purpose flour, baking powder, and salt. Gradually add this mixture to the wet batter, stirring gently after each addition. Mix only until everything is just combined to maintain a tender crumb and avoid overworking the dough.
-
6Incorporate the pure vanilla extract into the batter, stirring just until it is evenly mixed throughout the filling.
-
7Pour the prepared filling into your pie crust, using a spatula to smooth the surface. Spreading the filling evenly ensures uniform baking and a professional appearance.
-
8Carefully transfer the pie to your preheated oven. Bake for 40 to 45 minutes, monitoring its progress. The pie is ready when the top turns a light golden brown and a toothpick or cake tester inserted into the center emerges with just a few moist crumbs attached.
-
9Remove the pie from the oven and rest it in the pan on a wire rack. Allow it to cool undisturbed for at least one hour, as this helps the filling set and makes slicing easier.
-
10For an attractive finishing touch, sprinkle the fully cooled pie with powdered sugar if desired. Slice it into portions and serve at room temperature or slightly chilled, depending on your preference.
Approximate Information for One Serving
Nutrition Disclaimers
Number of total servings shown is approximate. Actual number of servings will depend on your preferred portion sizes.
Nutritional values shown are general guidelines and reflect information for 1 serving using the ingredients listed, not including any optional ingredients. Actual macros may vary slightly depending on specific brands and types of ingredients used.
To determine the weight of one serving, prepare the recipe as instructed. Weigh the finished recipe, then divide the weight of the finished recipe (not including the weight of the container the food is in) by the desired number of servings. Result will be the weight of one serving.
Did you make this recipe?
Please consider Pinning it!